Nail In Tire Car | 10 Tips On How to Fix It With A Patch Kit
We all have experienced that sickening feeling when we walk outside to go somewhere, and one of the tires on our car is flat or losing air. While it could be a leaky valve stem, in many cases, it is a nail or screw that has been picked up, puncturing your tire and causing the leak.
A nail in the tire tread can be repaired using a tire repair kit, available at most auto stores. These tire plugging kits are inexpensive and easily used to plug a nail hole. So, how do you fix a nail in tire?
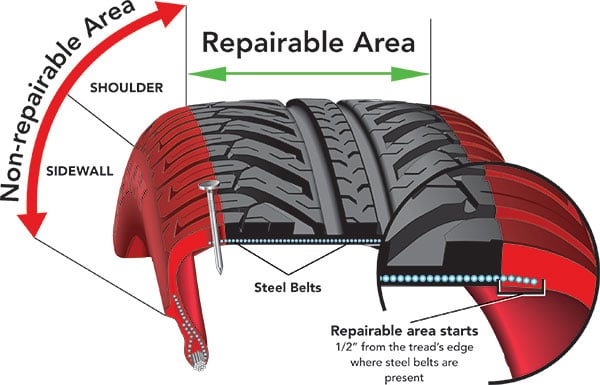
Note that if the tire puncture from a nail lies in the sidewall area of the tire, tire manufacturers indicate that it is not safe to repair the tire. Damage to the sidewall steel belts can cause a blow out while driving on the highway and could cause loss of control of your car and possibly a severe accident.
Consumers can save themselves time and money by repairing their tire when there is a nail in your car tire.
No waiting at a tire repair shop, no expense associated with paying a certified mechanic, and it is relatively easy to remove the nail or screw nail in your tire and plug the hole with a tire plug kit. A nail in my tire does not have to be a significant expense.
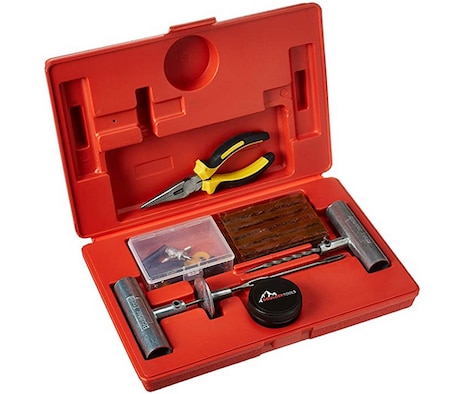
Every tire repair kit should include the basics such as an awl to ream out the puncture to prepare it for the plug, a plug insertion tool to insert the plug and rubber cement to spread over the plug before it is inserted into the tire.
Some plug and tire patch kits may also include extra plugs, pliers to remove the nail, a knife to trim the plug, and other small tools for your tire repair task.
Always follow standard safety procedures when removing a tire from your car. E.g., park the car on a flat surface, place blocks behind the wheels, and never crawl under the car unless safety jacks have been placed under the vehicle.
1. Lift the car up and remove the tire
You can use the car tire jack to lift the car and remove the tire from your vehicle. A nail hole can be patched or plugged while the tire is still on the car. However, it is much easier with the tire removed. This is also a good time to check if brake repairs are needed when the tire is removed from the car. Add tires checked to your car maintenance checklist.
2. Find the nail turning the wheel
The nail may be evident in many cases; however, if you are unable to find it visually, spray a combination of soap and water on the tread of the tire. Air escaping from the tire will cause bubbles to form, indicating the source of the leak.
3. Use a marker and draw a circle around it
Once you remove the nail, it may be difficult to see where the hole is. Use a white grease marker and draw a circle around the hole to help you keep track of the location of the hole.
4. Remove the nail with pliers
Use pliers to pull the nail out of the tire. If it is a screw nail, use the pliers to unscrew the screw nail. Pulling the screw nail out could damage the tire further and enlarge the hole too much, making repair difficult.
5. Ream the hole with the reaming tool
A reaming tool or awl comes with the tire repair kit. Use this tool to ream out the hole to prepare it for the insertion of the plug. You do not need to overdo this action. Several back and forth motions of the awl is sufficient.
6. Use lubricant before inserting the plug
Many kits come with a lubricant or tire cement that acts as a lubricant. Spread the liquid over the plug as well as at the location of the nail hole to enhance the insertion of the plug.
7. Insert the plug with the plug tool
Place the plug on the plug tool, add lubricant or glue provided on the plug, and insert the plug into the tire. Every tire repair patch kit comes with instructions that should be followed.
8. Remove any excess with a knife
After insertion, pull the plug tool out of the tire. There should be approximately half an inch of the plug extending from the tire. Cut this excess off flush with the tire using a knife of wire cutters.
9. Check the tire pressure
The next step is to verify your work. Pressurize your tire, checking your tire pressure, and spray some of the water and soap liquid over the plug to ensure the leak has been repaired are some of the steps that should be followed.
Spray soap and water onto the valve stem and around the rim to ensure there are no additional leaks.
Watch a quick video explaining how to use a plug and patch kit to repair a tire:
A professional will complete the same steps just covered, so why not do this work yourself. If there is a leak at the valve stem, it might be as simple as reseating the valve to stop air leaking out.
Leaks around the rim will require the tire to be removed from the rim, cleaning of the rim, application of tire glue, and re-installation of the tire on the rim. Not everyone has the equipment to accomplish this task.
Most car owners take their tires to a professional to be professionally repaired for these situations.
Tire manufacturers recommend that the sidewall and shoulder of a tire cannot be repaired if a nail or screw penetrates the tire. The repairable area is in the tread area of the tire.
Additionally, the sidewall is designed to flex as the tire encounters potholes and bumps in the road, which could weaken the tire around the plug area.
A blowout of the tire could occur with sidewall plug installations potentially causing an accident if it occurs at high speed. If you are in doubt about the location, take your tire to a professional for advice.
The number of patches or plugs varies by manufacturer; however, three plugs appear to be the maximum with some caveats. Plugs must be in the tread area only, and they must be at least 90 degrees apart.
Run-flat tires typically only allow one plug installed in the same manner as above. Some manufacturers require that there must be 1.6mm of tread left on the tire.
All tires are speed rated. Once the tire is damaged in any way, including a tire repair with a plug, the speed rating is void. Improper repairs also void the limited tire warranty. If you do have to replace a tire, always replace it with the same speed rating and tire manufacture to maintain control and stability at high speeds.
How to repair a nail in your car tire?
A. Use a DIY plug and patch kit on your tires
B. Professionally repaired?
What is the non-repairable area in the tire?

How many nail patches or plugs are enough for your tire?
F.A.Q. for Fixing a Nail In Your Tire
There are many frequently asked questions, and we have included some of the more popular questions in the following material:
Is it safe to drive with a nail in my tire?
Tires repaired properly are safe to drive. Follow the guidelines of the manufacturer regarding patches and plugs. Speed ratings may be voided for some tires as well as warranties.
In addition to plugging the tire, your tire may need to be re-balanced. The added weight of the plug could be just enough to unbalance the tire causing vibration at higher speeds.
Do not patch or plug tires in the sidewall. This repair is considered unsafe and could cause a major blowout, particularly at high speeds.
No more than three plugs are suggested, and the tread should be at least 1.6mm thick. Otherwise, consider purchasing a new tire of the same make, model, and speed rating to ensure stability at higher speeds.
Do I need to repair or replace my tire?
Tires with punctures in the sidewall need to be replaced as do tires with less than 1.6 mm of tread left on them. Manufacturers consider these punctures too dangerous to repair.
Consumers concerned about speed ratings may also want to spend the money to replace a tire since the speed rating is void in most cases once the tire is punctured and repaired.
In most other situations, a tire can be repaired. If in doubt, have your tire checked by a professional at a collision center or tire repair shop. This could also be an excellent time to have your battery checked in case you need a battery replacement and minimize overall maintenance costs.
What to do if your tire is losing air?
If your tire is not flat and is losing air slowly, add air to bring it up to normal pressure and head to a tire repair shop or purchase a tire repair kit.
Check your tire for a nail puncture hole as well as the tire valve to ensure it is not leaking. If your tire is flat, change the tire, install your spare tire, and follow the tire repair steps outline earlier in this blog. Consider using a tire patch kit for quick solution.
How to prepare beforehand?
Park your vehicle in a safe flat location. Place blocks behind the wheels to prevent accidental movement of the car while the tire is removed from your car.
Layout your tools, which should include a tire awl, plug insertion tool, tire cement, tire plugs, pliers, knife or wire cutters, and water mixed with soap to help find the leak.
When buying a car on preowned specials it is crucial to check the tire conditions. Also, having a portable air compressor can help your in a emergency situation.
Tip: Checking your tire pressure periodically is always a good practice.
Nail In Tire Summary
Car owners can quickly repair their tires using tire repair kits purchased at many auto stores. Check your tire manufacturer’s guidelines for any limitations to speed ratings and warranty for a repaired tire. Practice safe wheel removal to prevent accidents.
Using tire repair kits to plug the tire can reduce the cost of tire repairs compared to using a professional repair shop or tire store. Most shops usually offers experience when dealing with a patch. With this tips you are now prepared to deal with a nail in tire.
Sidewall punctures should not be repaired. Replacing the tire is the only option, and tires should be replaced with the same speed rating, make, and model.
Car worth is also enhanced with all tires replaced, and many tire dealers may provide financing via a finance application from their finance centers. If you have a flat tire for lost of periods of time then consider replacing the tire. Follow our automotive blog for other related questions.
Last Updated on: October 22, 2024


